okay, this won't be a happy post either, but i thought i would just share a few links here.
first, there was this article about some microsoft ie security problem, and the opensource evangelists started to hype again linux about being open, etc, etc. you know the story.
the sad fact is that, just being opensource, or let's say even having an open scm will not guarantee that all the details are published. i want to pick up a minor issue, so that i can be sure about i don't publish any details here which may not public.
let's take this commit. it's a bugfix, right? umm, if it would be security-related, they would mention it. hm, no.
to make the long story short, the relevant cve is there, even secunia released an advisory.
i could add few more details (no cve on the secunia page, the "from remote" is probably wrong), and finally make some conclustions, but i would avoid that this sime.
i find it really interesting that some people think that the scm for free software doesn't matter that much. just think about the "open"suse buildscripts, where the svn (in which they are tracked) is closed, or about "free"bsd, where the perforce repos (where _real_ development happens) is not checkoutable anonymously.
and no, i'm not rms who says you must use a free scm to develop free software, i just think a public access to it would be nice.
of course there are other projects like archlinux as well (no anonsvn), but i didn't wanted to start with it, since this post is not (just) about distro war..
ah and yes, the best of these is Debian where many maintainer use just a single huge generated diff and the real scm where they develop such diffs isn't public, either.
(finally a bad example is Ubuntu where the whole webapp behind the distro where all the bzr code and bugs are stored is closed source as well.)
so at the end it'll turn out that we're more free, without having any "open" or "free" in our name, without having a frugalware-legal@ and such? ;)
update:
the blacklist seem to grow.
see gentoo, where the releng repo isn't public, either.
an other funny fact is that they refuse to give security support for the kernel, the base of your system..
git-1.5.6 will be released soon (probably in a few weeks) and there are some interesting news in it.
one of them is the new git cvsimport -W switch which makes it easy to do bi-directional changes between git and cvs.
to set up your local repo:
$ CVSROOT=$URL cvs co module
$ cd module
$ git cvsimport
this will do a fresh checkout of the cvs module and will import it to git. you will have two interesting git branch: origin is the "reference" one, you should not touch it, and you can work in master.
you can commit to master, etc.
then there are two tricky operations:
first, you may want to commit back your local commits.
to do this:
$ for i in $(git rev-list --reverse origin..master)
do
        git cvsexportcommit -W -c -p -u $i
done
second, you may want to fetch upstream changes and rebase your local changes on top of them:
yesterday somebody mentioned on #git this talk. it's not a real video, just audio + slides but it's really nice. i would say if the "Linus one" made you say "heh, this may worth to check out" then this one will be the "hey, this one prevented me from learning things the hard way".
it's just one hour and it describes so many important tricks that i haven't encountered elsewhere yet.
uhm, this will be a long post, but i'll try to keep it short :)
a few words about fop. we write our documentation in asciidoc. asciidoc is plain text with a very simple markup, asciidoc can convert this to docbook. then docbook-xsl can convert this to .fo, finally fop can convert .fo to .pdf.
my problem with fop is that it's written in java and we just used the upstream binary. this is primarily a security problem.
so, about one and a half months ago got the crazy idea to compile fop from source. of course the correct way to do this is to package first the depends. this is really a avalanche, becase we didn't have too much generic java libs packaged, so i had to package many. namely:
the nice thing is that all these (except xmlgraphics-commons because classpath still lacks jpeg support) are compiled with the ecj/gcj toolchain, without any sun blob.
now we got rid of fop-devel, since this version can both convert ttf fonts to xml ones (needed if you want to embed custom fonts into pdf) and convert fo documents to pdf ones.
ok, this post will be a big generic, but it seems this is still totally new to some people. so, the Message-ID header in an email is ideally unique and you can easily use it to refer to an email in an other discussion.
in this post i want to deal with 3 issues:
first, how to display it in your mail client. ok, this depends on your mue, in mutt, you need to add
unignore message-id
to your muttrc.
second, if you want to search for a message-id in a folder, that's your mua's task as well. in mutt, you can do it by for example
i recently packaged source-highlight, and asciidoc can nicely use it. an example page (example codes using pacman-g2 bindings in 4 different languages) available here. yay! :)
Először is kell 8 db fakocka. A méret tetszőleges, én 25 mm nagyságút használtam. Ezt fogom
beborítani kívül-belül képekkel. Egész pontosan 3 db nagy kép és 6 db kis kép kell. A nagy képet úgy
kell elképzelni, hogy 4 x 2 kocka (ill. kockának egy lapja) nagyságú, a kicsi meg 2 x 2. Ez azért
praktikus így, mert 1 kockára való képet össze lehet tenni pont egy A4-es lapra amit ki lehet
nyomtatni fóliára. A módszer nem tökéletes, mivel erről a fóliáról könnyen kopik a festék, így
papír-írószer boltban kapható széles celluxszal (az a nagy, 5 cm szeles) le kell ragasztani a fóliát
felülről is. A Copy General 500 DPI-s nyomtatót használ, tehát egy kockalapra való képet 1100 px
szélesre érdemes készíteni.
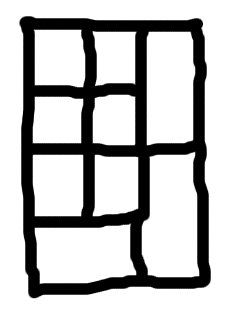
Az A4-es képet kézzel is el lehet készíteni, meg egy scripttel is -- de ez utóbbiról később. Ha
kézzel akarjuk akkor így érdemes elrendezni:
1
Ha scripttel, akkor egy enkockam könyvtárban lesz 4es meg 8as nevű alkönyvtár és abba kerül a
3 db 8-as és 6 db 4-es kép. ezután kell a kocka.py:
$./kocka.pyenkockam
Ez elkészíti az enkockam.jpg file-t.
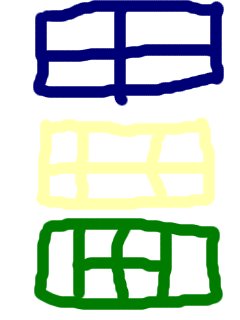
A következő kérdés, hogy ezeket a nagy és kis képeket hogyan érdemes felvágni. Ha túl sok vagy kevés
vágás lesz, akkor vagy nem lehet körbeforgatni a kockát, vagy szétesik a kocka. Színezem a képeket,
hogy ne kavarodjanak össze.
Nézzük először a nagyobb képeket, sötétkék, világossárga és sötétzöld:
2
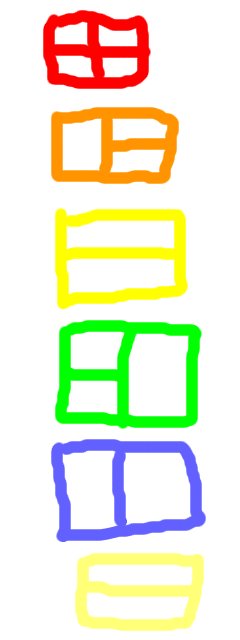
A kis képek vágása: piros, narancs, sárga, világoszöld, világoskék, krémsárga:
3
A kocka 6 lépésben körbeforog. Felragasztás: A 8 db kis kockát négyzetekbe rendezzük, és egymásra
helyezzük. Tegyük fel a tetejére a narancsot, úgy felvágva, ahogy a rajzon látható. Húzzuk le a
hátáról a fóliának a külső rétegét és ragasszuk is rá. Előttünk lesz a krémsárga oldal (szintén a
rajzon látható módon, tehát a vágás vízszintesen van), balra a piros, jobbra a sárga (a vágás
függőlegesen legyen, a rajzhoz képest 90 fok forgatással), hátul a kék (a vágás vízszintesen
legyen), alul pedig a világoszöld (rajzhoz képest 180 fok forgatás, ugyanúgy jobbra lesz a kis rövid
vágás mint a tetején a narancsnál).
Ha idáig eljutottunk, akkor (felülnézetből) a jobb alsó és a jobb felső hasábját ki lehet hajtogatni
a kockának. (felülnézetből egy 4 kocka magas narancssárga csíkot kapunk). Jobboldalt az egész nagy
felületet elfoglalja a sötétkék. Már csak a sötétzöld és a világossárga maradt. Forgassuk el balra
hossztengely szerint a nagy kockát, Tehát felfele fog nézni a nagy kék felület. Most nyissuk szét a
nagy kockát úgy, hogy hosszába a bal felét balra, jobb felét jobbra forgatjuk 90 fokkal. Továbbra is
téglatest lesz előttünk, de most már a kék rész jobb és baloldalon függőlegesen lesz, és nem
borított rész tárul elénk. Ide kell a világossárga.
Már csak a sötétzöld maradt. A cél, hogy ez kívülre kerüljön. Menjünk vissza két lépést, amikor a
kocka még egyben volt: összecsuk, újra kék lesz felül, forgat jobbra 90 fokot, narancs csík lesz
felül, alul-felül összeforgat úgy, hogy kocka legyen újra. Most áthajtjuk a kocka felső felét jobbra
úgy, hogy újra téglatestet kapjunk. A világossárgát fogjuk látni megint, és bal- meg jobboldalt a
szélén pedig a kettészedett pirosat. Elforgatjuk az asztallapon a kockát 90 fokkal. Ugyanúgy ki
fogjuk nyitni, mint mikor kékből sárgába mentünk át, csak most a sárgából csupasz lap lesz, és erre
a 8 kockalapra fog kerülni a sötétzöld.
Frissítés: 2025-ben ezt a leírást követve úgy tűnik, hogy az utolsó kettő sorrendje fordított kell,
hogy legyen, tehát sötétzöld az utolsó előtti és a világossárga az utolsó.
Frissítés 2: újra követve a leírást úgy tűnik, hogy az utolsó kettő vágásának egyeznie kell, tehát a
sötétzöld szerint kell felvágni a világossárgát is.