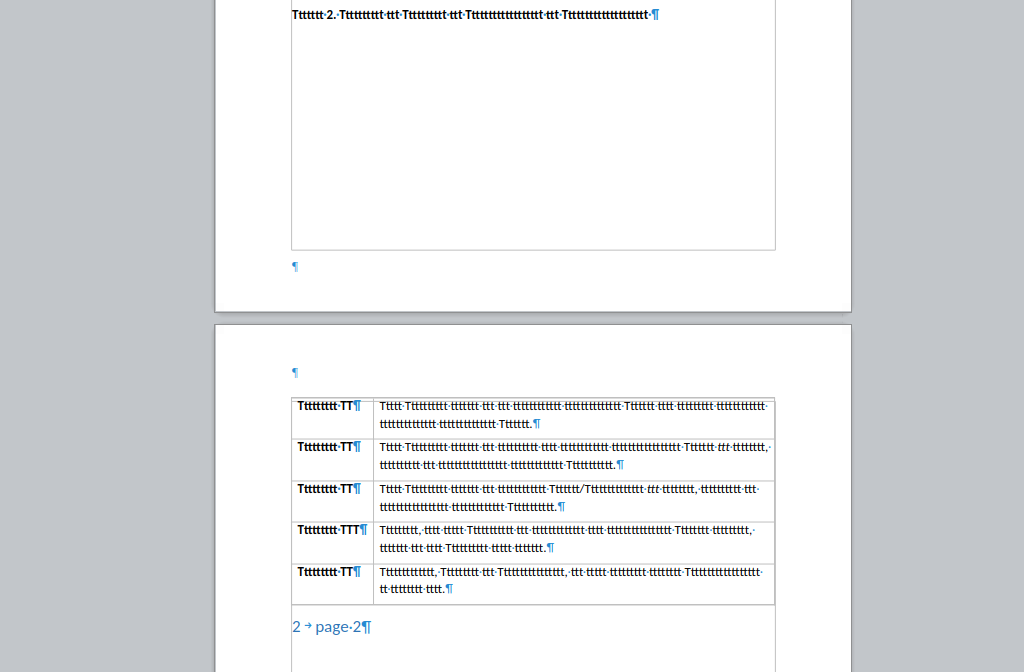
Previous posts described the hardest part of multi-page floating tables: making sure that text can
wrap around them and they can split across pages. In this part, we'll look at a conflicting
requirement. On one hand, headings want their text to not split across pages (and shapes anchored
into paragraphs are considered part of the paragraph, too). On the other hand, it should be OK to
have a floating table at the bottom of a page and the following heading to go to the next page.
It turns out, Writer gave "keep together" a priority, while Word gave "floating tables are OK to
split to a previous page" a priority.
Note that if you have a shape (e.g. a triangle) and not a floating table, then both Word and Writer
prevents the move of that shape to a previous page (if the shape is anchored in a heading); this
difference was there just for floating tables.
This means that we leave layout for shapes unchanged in general: shapes anchored in headings are
still considered to be part of headings and don't split. But for floating tables, we now allow them
to split and use space at a previous page if they fit there.
You can get a development edition of Collabora Online 25.04 and try it out yourself right now: try
the development edition. Collabora intends to continue
supporting and contributing to LibreOffice, the code is merged so we expect all of this work will be
available in TDF's next release too (26.2).
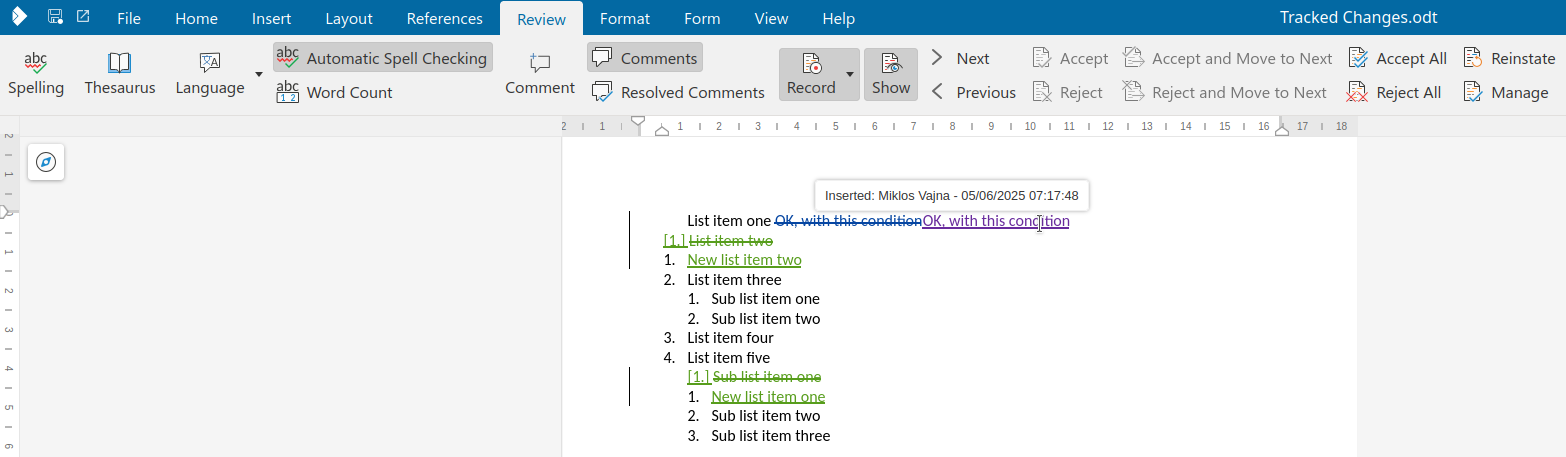
Writer has some support for interdependent (or hierarchical) tracked changes: e.g. the case when you
have a delete on top of an insert. See the first
post for background.
This work is primarily for Collabora Online, but the feature is
available in desktop Writer as well.
With the already mentioned improvements in place, a few areas were still lacking: we didn't have UI
for all cases where the DOCX import was possible already; combining tracked changes (redlines) were
not complete (so you don't have to reject all parts of a logical redline one by one) and some of the
undo/redo code didn't work as expected.
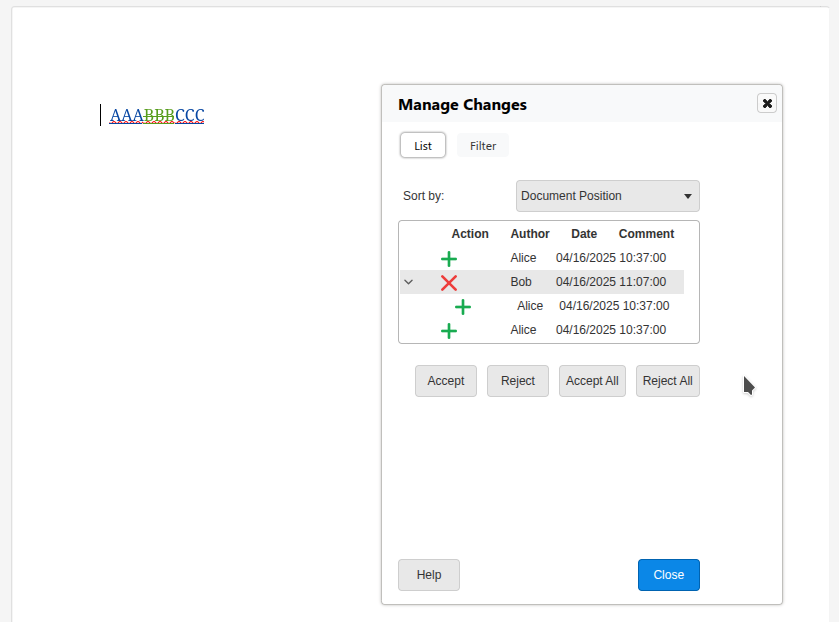
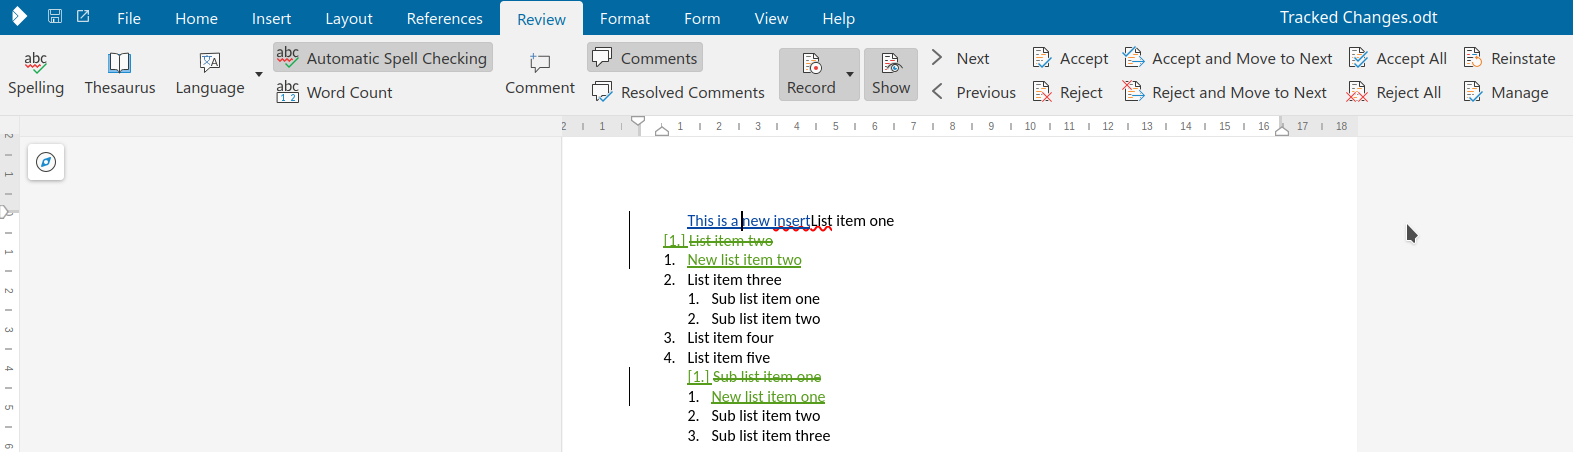
Here is a sample case where the UI was missing to create something that was possible to import from
DOCX: a format redline on top of an insert redline.
You can get a development edition of Collabora Online 25.04 and try it out yourself right now: try
the development edition. Collabora intends to continue
supporting and contributing to LibreOffice, the code is merged so we expect all of this work will be
available in TDF's next release too (25.8).
Writer has some support for interdependent (or hierarchical) tracked changes: e.g. the case when you
have a delete on top of an insert. While there were some working cases, handling of many
combinations were missing. I started to make systematic improvements in this area in the recent
past, this post gives you an overview what's done so far.
This work is primarily for Collabora Online, but the feature is
available in desktop Writer as well.
DOCX files in Word can often have overlapping tracked changes: Writer tries to split these up to
make sure there is only one tracked change under the cursor at the same time. Still, it's possible
that you have a tracked change with multiple types: e.g. a delete on top of an insert.
The focus in on 3 combinations which appear in DOCX files a lot: "insert, then delete", "insert,
then format" and "delete, then format".
This mostly affects the UI and import/export filters of ODT and DOCX.
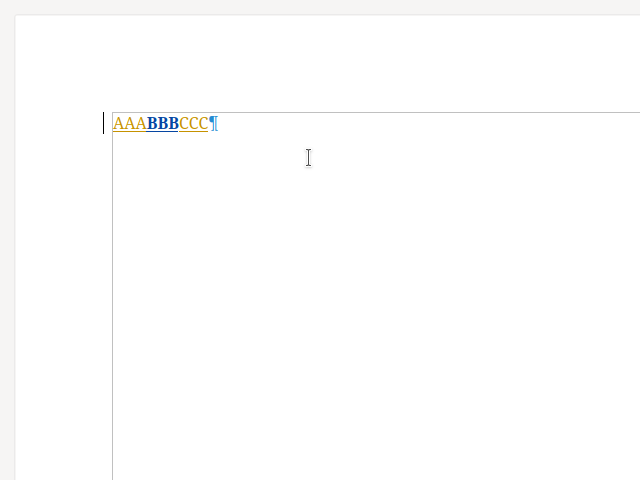
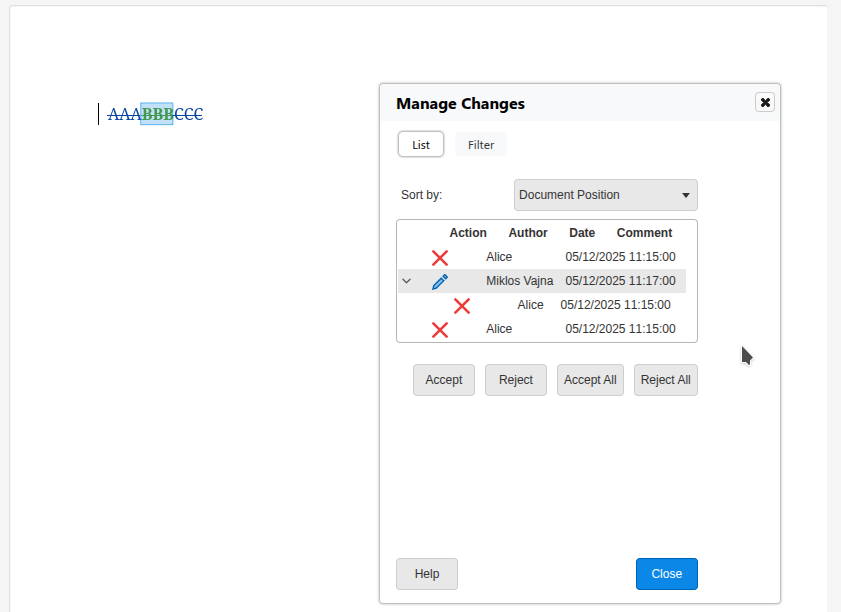
Most operations worked nicely here, but in case your cursor was in the middle of AAA and you did a
reject, followed by an undo, proper handling of that was missing, now implemented.
Accepting when you're inside AAA is now implemented: the insert is accepted for BBB but the
format stays unchanged.
Rejecting when you're inside AAA is now implemented: the insert is rejected and BBB is also
removed, together with the format on top of it.
Accepting the BBB now correctly operates on the insert type, so the format type remains after
accept.
If you accept BBB, now the surrounding AAA and CCC also get accepted as well, as expected.
Now if you reject BBB, then it gets removed from the document, since you rejected an insert.
When you reject BBB, the surrounding AAA and CCC also get rejected.
The combined implementation of these should give you a smooth feeling in case you're used to how
Word works: if there is a format redline combined with an insert, then the operations act on the
insert type, and format is only accepted/rejected when there is no insert "under" the format.
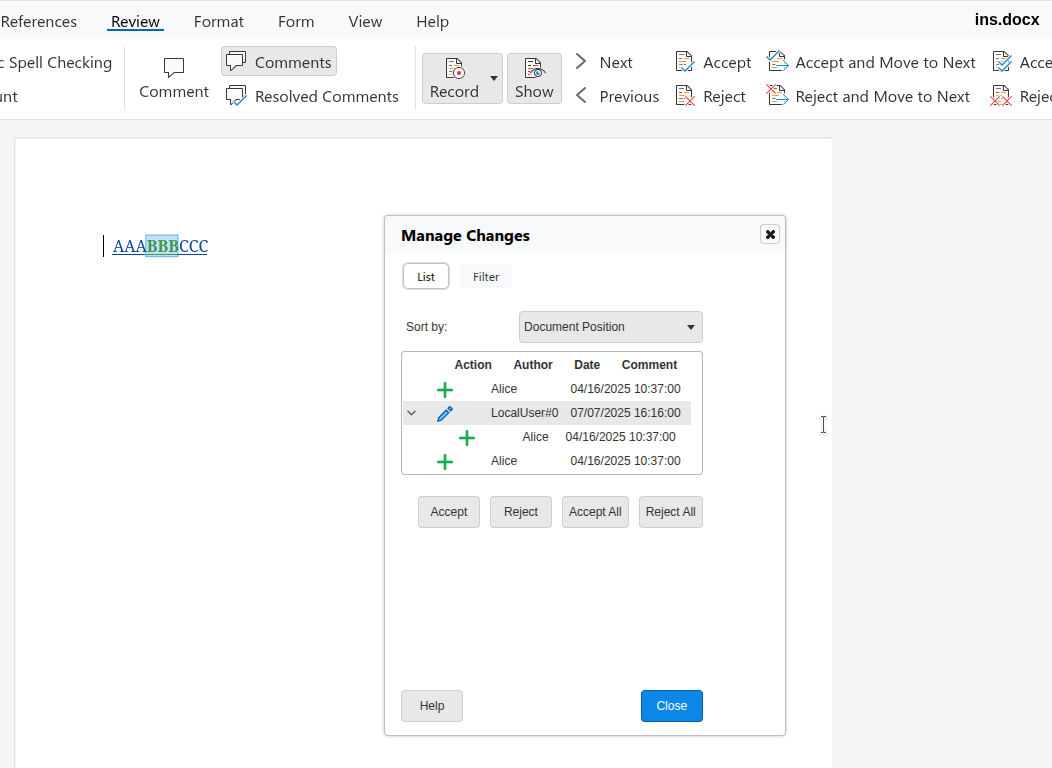
Similarly: it's a bit of an implementation detail that Writer splits redlines on DOCX import: so if
you e.g. accept AAA then we combine that with BBB and CCC when it makes sense, so you need to click
a lot less.
Accepting AAA now correctly operates on the delete type of BBB.
Rejecting AAA now correctly operates on the delete type of BBB.
Accepting BBB now correctly works with the delete type.
Accepting BBB now correctly tries to also accept AAA and CCC, too.
The current state is not yet complete, but it's a big improvement over what we had in the past,
which was mostly focusing on just "insert, then delete".
You may wonder what about some other cases: if you insert some content with change tracking, that
always creates a new tracked change, so "insert" is never on top of something else. Similarly,
format is always on top of something. Finally the same type is never on top of itself.
You can get a development edition of Collabora Online 25.04 and try it out yourself right now: try
the development edition. Collabora intends to continue
supporting and contributing to LibreOffice, the code is merged so we expect all of this work will be
available in TDF's next release too (25.8).
Writer has the concept of rejecting tracked changes: if a proposed insertion or deletion is not
wanted, then one can reject it to push back on the proposal. So far such an action left no trace in
the document, which is sometimes not wanted. Calling reinstate on a change behaves like reject, but
with history: it reinstates the original state, with the rejected change preserved in the document.
This work is primarily for Collabora Online, but the feature is
available in desktop Writer as well.
When Alice works on a document to insert e.g. new conditions for a contract, then perhaps Bob is not
happy with the proposal. But just rejecting the change "silently" would not be polite: the tracked
change then disappears, so possibly Alice thinks it was accepted and Bob didn't communicate the
pushback explicitly in the resulting document, either.
Reinstate is meant to improve this interaction: if an insert is reinstated, then an explicit delete
is created on top of the insert, so Alice can see that Bob was not happy with the proposal. Or in
case Alice proposed a delete, Bob can reinstate that by adding the same content again to the
document, without typing the text manually after the delete.
This is a UI feature: the resulting model still only contains inserts and deletes, so it works even with
DOCX files.
As you can see, this creates the opposite of the original change as a new tracked change, so it will
in the end still reject the change, but without deleting the original change.
You can get a development edition of Collabora Online 25.04 and try it out yourself right now: try
the development edition. Collabora intends to continue
supporting and contributing to LibreOffice, the code is merged so we expect all of this work will be
available in TDF's next release too (25.8).
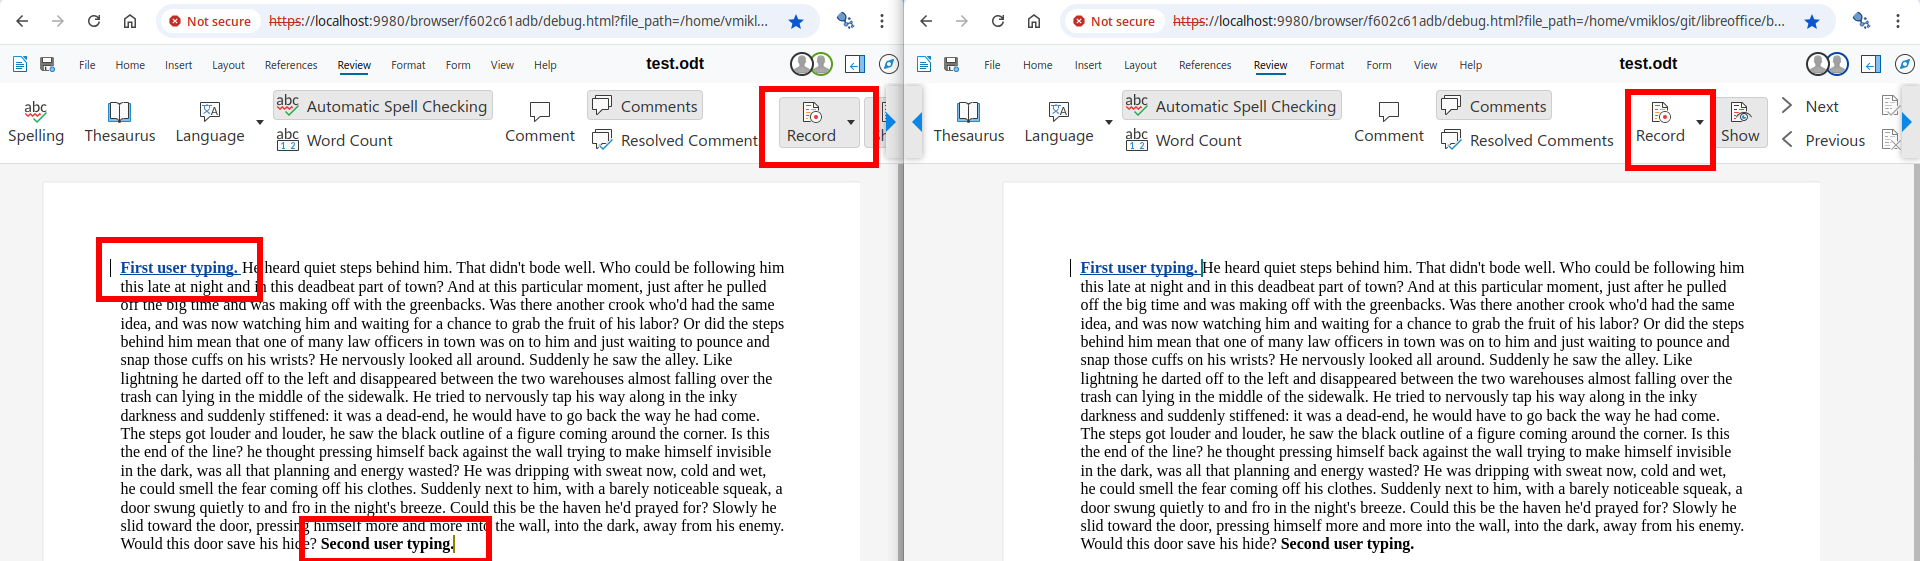
Writer has the concept of recording tracked changes or not: if recording, typing into a document or
deleting content will create tracked changes of type insertion or deletion. So far this was a
per-document setting, but now individual users can enable or disable this as they wish.
This work is primarily for Collabora Online, but the feature is
available in desktop Writer as well.
When Alice keeps typing and Bob enables change tracking, then surprisingly the typed characters of
Alice will form a tracked insertion, which is surprising, since that was not the case a second ago
and Alice didn't do anything other than typing.
Giving users a choice if they enable recording for just this user or for all users fixes this
problem.
You can get a development edition of Collabora Online 25.04 and try it out yourself right now: try
the development edition. Collabora intends to continue
supporting and contributing to LibreOffice, the code is merged so we expect all of this work will be
available in TDF's next release too (25.8).
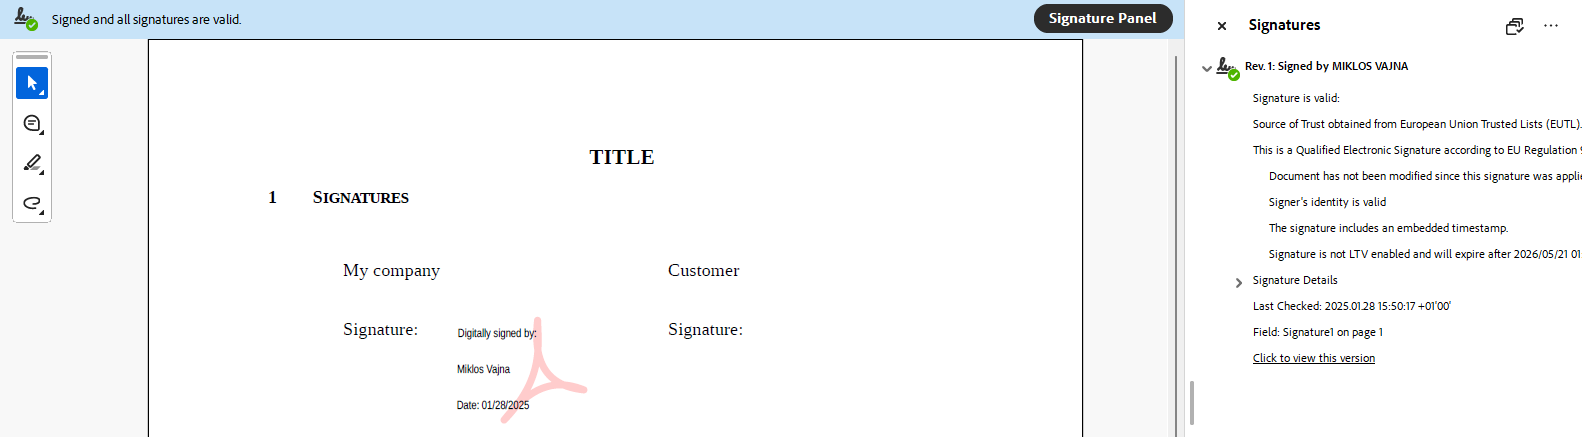
LibreOffice Technology had the concept of digital signing, but this was not available in Collabora
Online, so it was not possible to combine this with collaborative
editing. Also, once Collabora Online started to expose digital signing with software certificates
for ODF files, that also allowed taking a further step and start supporting electronic signing for PDF
files. Partnering with eID Easy, you can create strongest of the electronic
signatures – the mighty QES. This
means signing with Collabora Online allows you to:
create proper electronic signatures
not share your document with a 3rd-party, only the
hash of your
PDF will be sent to the external service
integrate with e.g. Nextcloud, use the feature without installing anything other than the
Nextcloud AIO image
potentially combine signing with other security features like Secure
View and
work with visual signing in a WYSIWYG way, which allows
placing a visible signature widget at the specified page, then dragging it to the preferred
position.
The sample integration presented here is for Nextcloud, but the feature can be made available in
other integrations as well.
See Collabora's blog
post
if you prefer less technical information about this feature.
Digital and electronic signing of documents is meant to be based on cryptographic security, and
traditionally this has been exposed to users in a very complex way. You need to know that first you
have to sign your macros and only then your document, you need to somehow get PEM files to have a
signing certificate, you need to somehow get your certificate trusted by some certificate authority
that is commonly trusted by other people who will verify your signature, and so on.
This lead to the need to first support digital signatures in COOL using a single signatures dialog
for ODF files and then later to provide electronic visual signing for PDF files, while continuing to
respect your privacy by not sharing your document with a 3rd-party service.
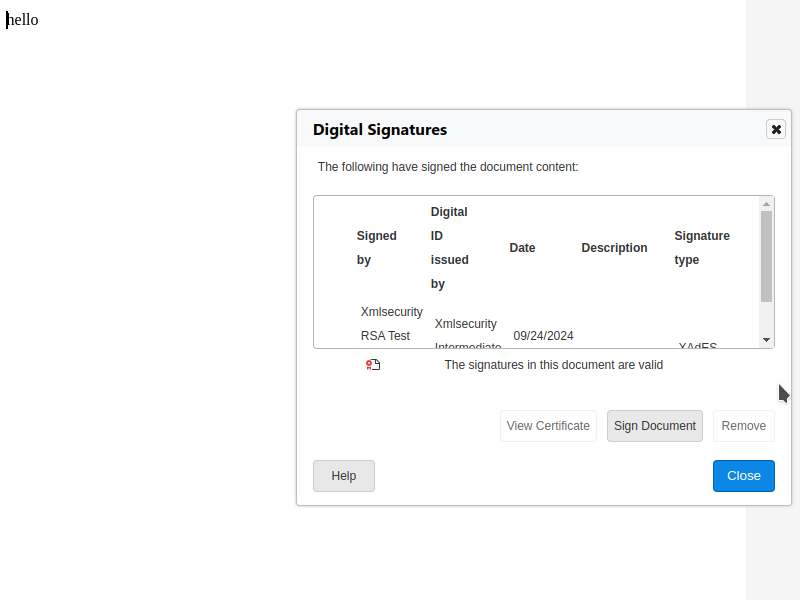
First the signature viewer dialog was turned into a read-write digital signatures dialog in COOL
that is still async (compatible with collaborative editing), first for ODF files & using PEM files.
Related to this, we automatically sign macros (if the document has macros) when signing the
document, so you can’t forget about this or get the order wrong (sign macros first, then the
document).
At this stage implementing signature removal was possible, which again needs an async conversion so
the user can confirm they really want to remove a signature. This also means the signature status of
the document can change, the COOL UI now supports this.
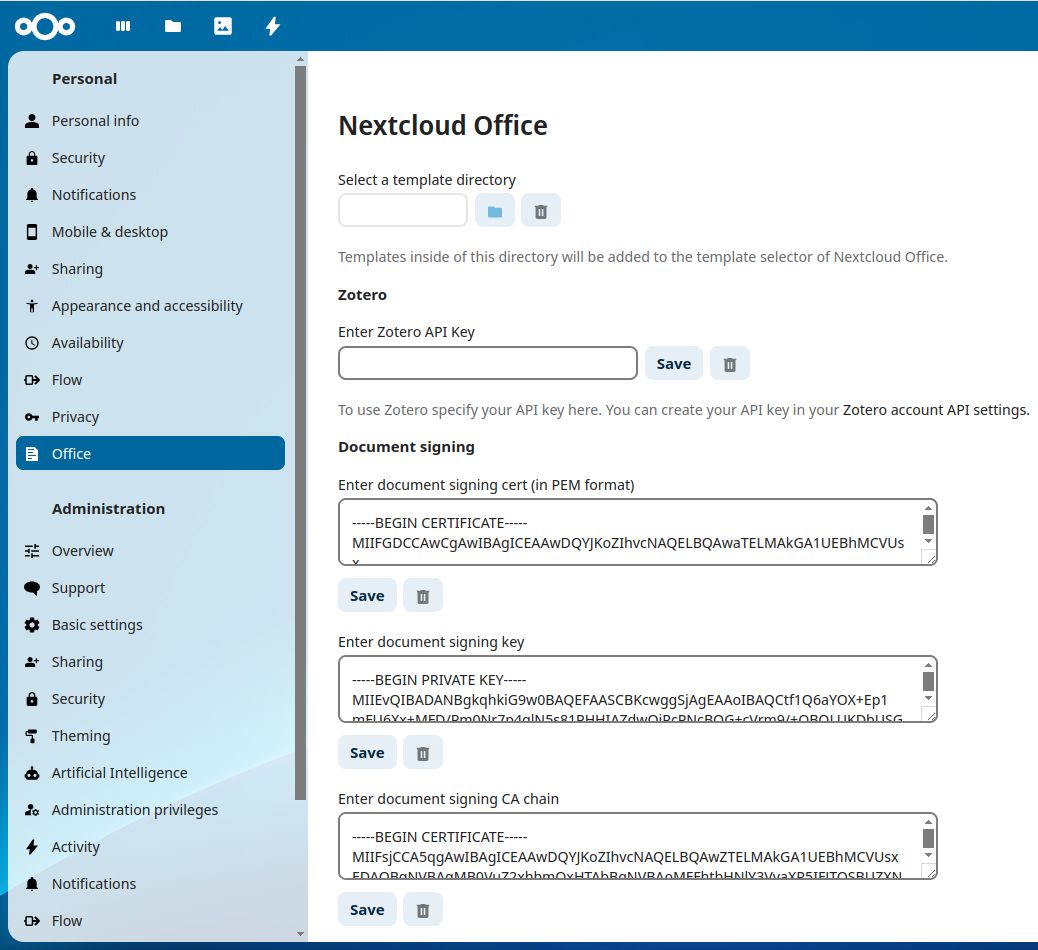
You can now associate a signing certificate / key / CA chain with a COOL editor, so you can sign the
document, but not an other editor working on the same document.
Finally adding a digital signature is now possible, where the certificate chooser just shows your
signing certificates and hides it from other editors.
Here is a screenshot of the early digital signatures dialog at this stage:
The second half of digital signing support in COOL started with WOPI extensions, so an integrator of
COOL can specify the signature settings on their user settings page and pass that to COOL when a
document is edited. We then send this to the document editor process only when needed, i.e. not on
file open, but when the actual signing process would start.
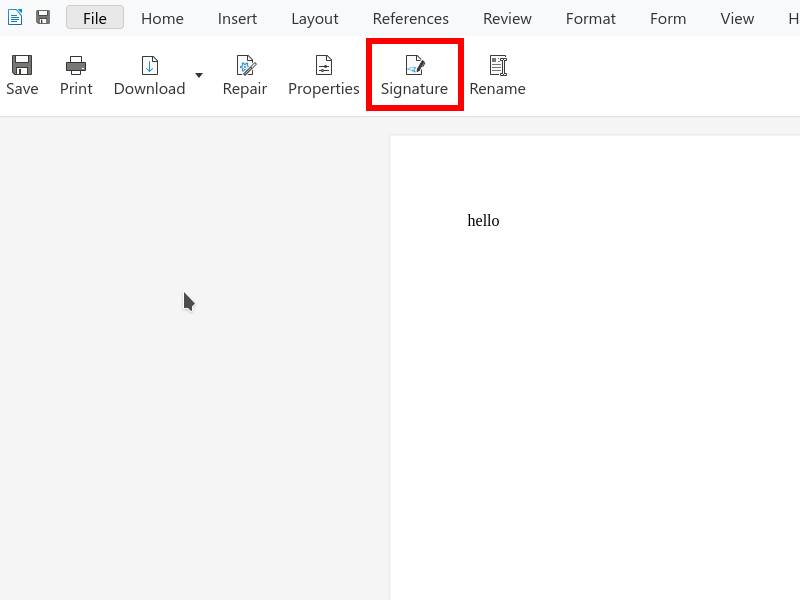
UI is also added on the notebookbar in the form of a new button that allows adding signatures to a
previously unsigned document – before you could only trigger the signatures dialog if the status bar
said something about existing signatures, and only then you could add a signature. This button is
hidden if you don’t have signature settings configured. It looks like this:
When was still missing here is automated Cypress tests to make sure signing e.g. an ODT file keeps
working and the SDK
documentation now
also describes what does it take to support digital signatures in your COOL integration. For example
you can create a Nextcloud integration like this:
Once digital signing of ODF files is handled, let’s switch to PDF signing, which is much more
interesting: you typically want to sign something final, and we see PDF as a final output of your
documents. So first support for digital signing of PDFs was added.
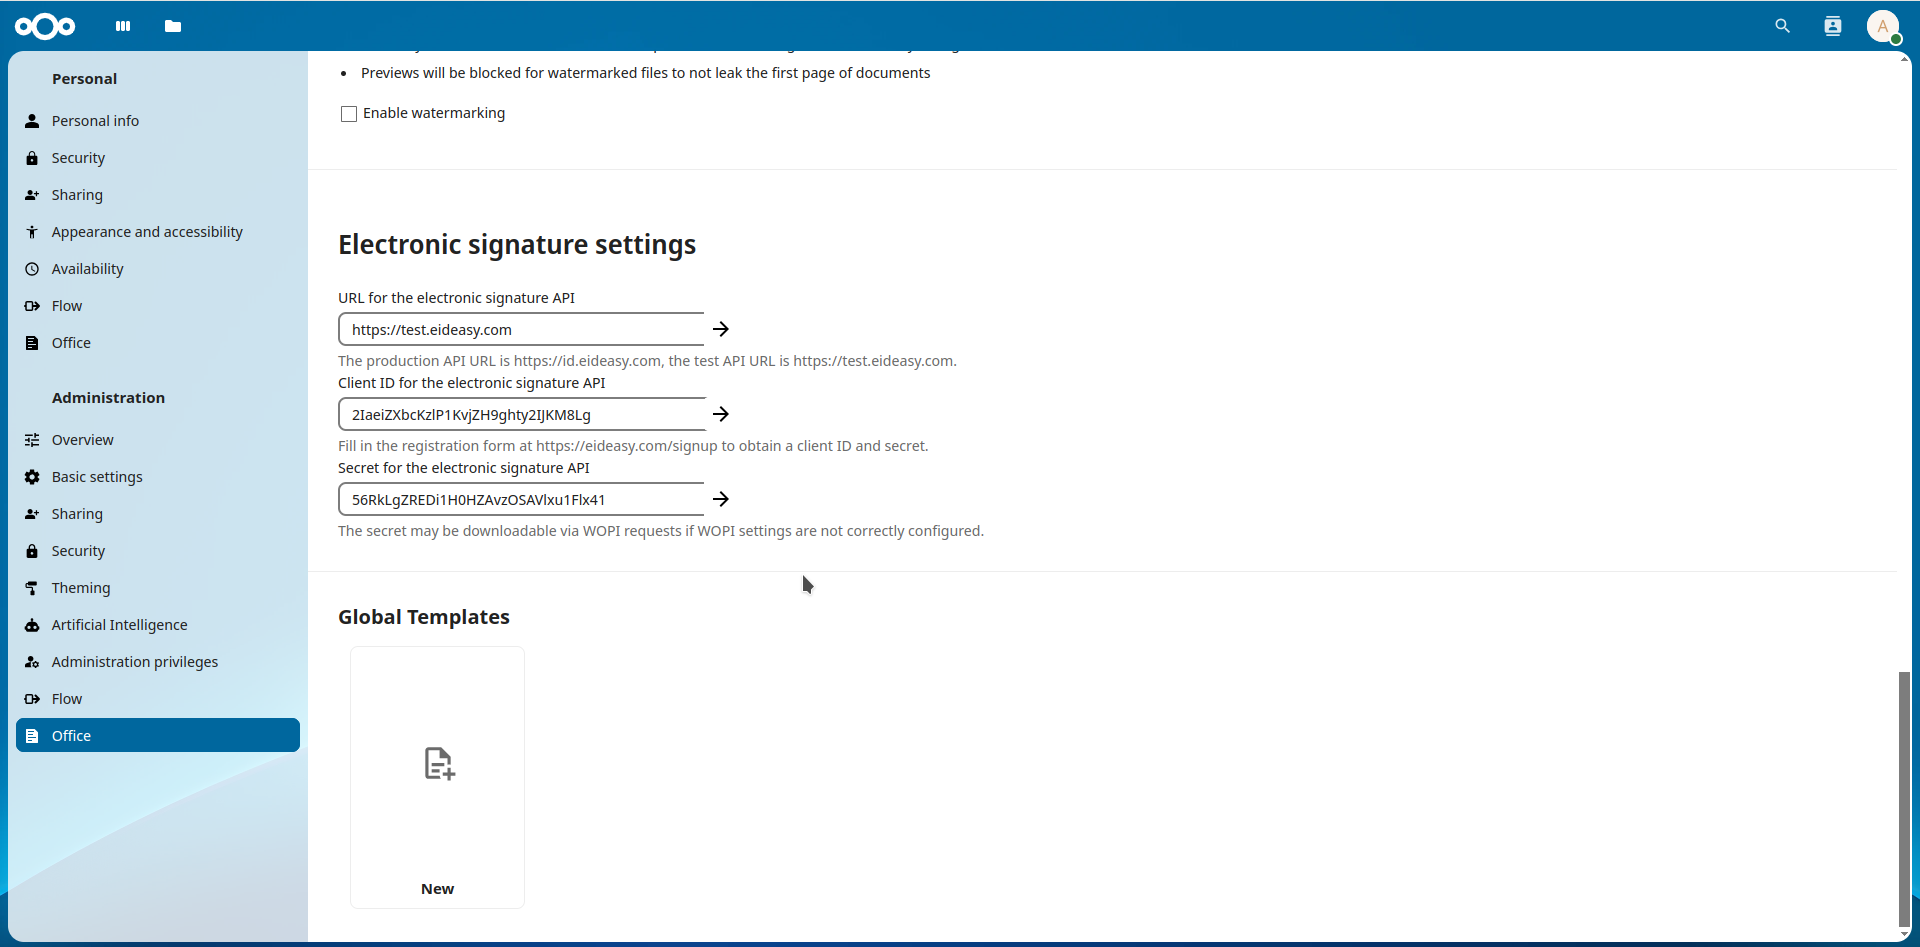
The next part is to integrate with eID Easy, which can do privacy-friendly electronic signing for
us. This is a 5 step process:
Extract the hash of the to-be-signed document. This is similar to signing, you start the process
but once you have the hash that you would sign locally, you just take that hash and abort the
actual signing.
Send this hash to the electronic signing service.
Open a popup and let the user authenticate with their credentials (passport, personal ID, etc)
using one of the providers (different providers support different countries) and sign the hash.
Download the signed hash from the service.
Serialize this signed hash into the local document. This requires producing the local PDF
signature once more, but this time using the previous timestamp (instead of the system clock, so
the hash is table) and using the downloaded PKCS#7 signature instead of locally signing something.
At the end we got something that looks like a signature produced externally, but there was no UI for
this. An initial popup for step 3 looked like this in the test environment (that doesn’t work with
real passport numbers or anything sensitive):
The next step was to create a user interface for electronic signing. The Insert menu had a new menu
item to insert electronic signatures and to specify your country, finally choose one of the
providers available in your country.
Also support for two types of providers is added: the first is the “in context” one, the other is a
“redirect based” one. We now support both: all the redirect (should be familiar to you if you ever
did e.g. online payments) happens in the popup, so the original COOL editor is never closed.
eID also has the concept of multiple tokens for signing: initiating the signing costs money, so is
done using a “secret”, which is never sent to the COOL JS code. Then the “client ID” identifies the
client, but can’t be used to start signing. Finally any single signing transaction has a specific
“document ID”. We took care to follow the guidelines here, so the sensitive “secret” for signing is
always kept on the server.
Similar to the initial document signing, electronic signing settings are also possible to specify
from an integration, we documented this in the
SDK
and also created a sample Nextcloud integration for this.
The last part of this electronic signing effort was to expose visual singing in COOL, something that
was added to LibreOffice Draw back in 2020, see this earlier blog
post.
First this was exposed in COOL with digital signing, in a way that the current page gets a signature
widget inserted at the page center and then the user can move that signature widget to the desired
location.
Combining this with electronic signing is a bit more tricky, since we don’t want to select a
certificate when the signature widget is inserted, we’ll deal with that in the external service, as
usual.
Also, there was no real reason to not use visual signing unconditionally, so now the way to initiate
a signing process is to open your PDF in COOL, use the Insert → Signature line menu item to insert a
signature widget, move it to the wanted position, click “finish” on the snackbar and that completes
the process with the usual electronic signing popup.
The final problem was that our multi-page PDF viewer was not really prepared to deal with changed
PDF content (assuming your PDF rendering will not change is reasonable), so some last minute work
had to be done to make sure the signature widget’s graphical selection indicator, its dragging and
its rendering works fine even on non-first pages of a PDF document.
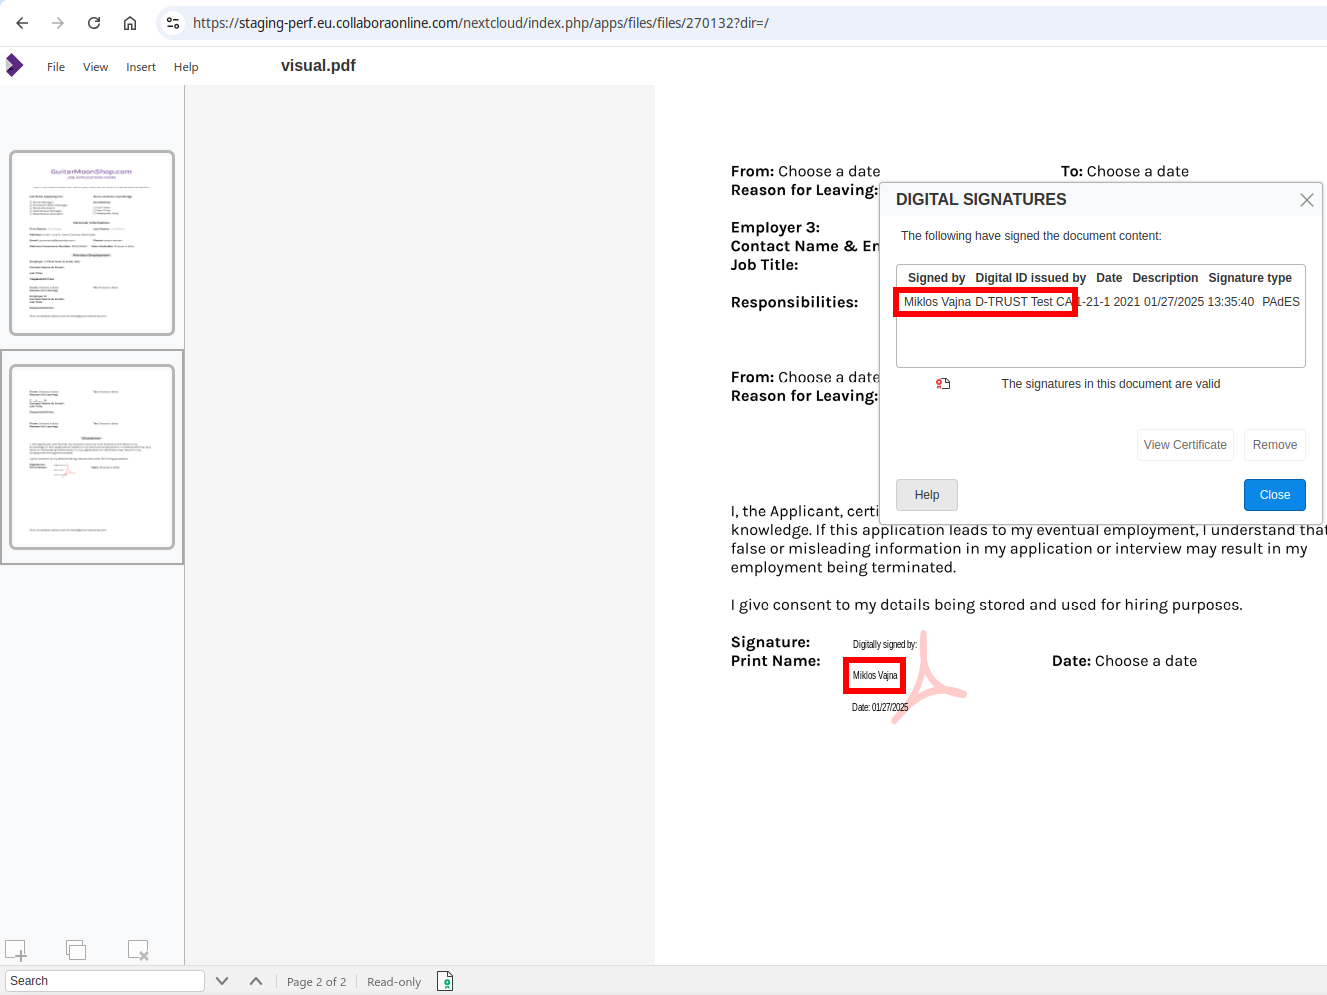
At the end, a test signature using the d-trust signature provider’s test environment looks like
this:
If you would like to know a bit more about how this works, continue reading... :-)
As usual, the high-level problem was addressed by a series of small changes.
Collabora Online now takes the visible area (viewport) of large
Writer documents into account in more cases, leading to better performance & interactivity.
Collabora Online has two kinds of "visible areas" for a document: on one hand, the entire document
is visible, so in case any part of the document changes, the browser client gets notified; on the
other hand, there is a viewport in the web browser, and keeping that up to date is a priority,
compared to the rest of the document.
There were some cases in the past where we handled the entire document with the same priority,
leading to slower than ideal update times on the UI.
Wouldn't it be nice to always update the visible part first, and only then deal with the rest, on
idle?
When looking at this topic, we noticed a cluster of problems:
First, consider the case of a long (~300 pages) document, where you insert a page break at the start
and wait for the update of the visible area. The entire document layout (now 301 pages) were
calculated, and now we do this for the visible area synchronously (and the rest on idle). This
operation is now about 19 times faster.
Second, loading a long document calculated the entire layout before showing the first page. This is
now improved, the document loading time itself at a LOK API level for such a long document is now
about 5 times faster.
Third, COOL didn't consider the priority of core tasks when interrupting to do its own work (COOL's
document editing process and LibreOffice core shares the same main loop). Now we do this,
categorizing the core tasks into "high priority" and "low priority" buckets and we only interrupt
when core doesn't have high priority tasks any more (this is only in 25.04).
Fourth, there was no easy access to a large Writer document during development. Now make run
COOL_WRITER_LARGE=y allows opening a long document in your local browser for development / testing
purposes.
Writer has the concept of paragraph margins and page margins, but what happens when you combine the
two? It turns out the expectation is that sometimes the top paragraph margin is ignored in this
case. We'll see two cases where the behavior of Writer is now improved to better match Word in this
regard.
This work is primarily for Collabora Online, but the feature is
available in desktop Writer as well.
As described in a previous bugreport,
there was a first problem where Word ignored the top paragraph margin of a document, but Writer did
not. A recent bugreport then pointed
out that the first implementation went too far and now a wanted top margin was ignored. This lead to
a set of conditions which now does a decent emulation of Word's rules in this regard.
You can get a development edition of Collabora Online 24.04 and try it out yourself right now: try
the development edition. Collabora intends to continue
supporting and contributing to LibreOffice, the code is merged so we expect all of this work will be
available in TDF's next release too (25.2).
Impress shape text doesn't have much support for styles, e.g. the default UI in Writer gives you a
paragraph style dropdown, and you don't get the same in Impress. Still, a paragraph style is
attached to bullets based on their outline level, and Impress has a View → Outline menu item to give
you that styled text you can copy. Pasting that to Writer started to lose styles recently and it's
now fixed to work again.
This work is primarily for Collabora Online, but the feature is
available in desktop Impress as well.
As described in a previous
commit, I had a
case where lots of not needed paragraph styles were exported to RTF in case an Impress document had
enough master pages. The idea was to only export actually used paragraph styles, to avoid wasting
CPU power.
Turns out filtering out paragraph styles has to happen at two locations:
in the style table to assign an index to a paragraph style
when referring to those styles
The problem was that unused styles were removed from the style table, but not from the style → index
mapping, so as soon as you had both used and unused paragraph styles, the declared and the referred
style indexes didn't match anymore.
You can get a development edition of Collabora Online 24.04 and try it out yourself right now: try
the development edition. Collabora intends to continue
supporting and contributing to LibreOffice, the code is merged so we expect all of this work will be
available in TDF's next release too (25.2).
Writer TextBoxes provide the user with shapes that can have complex geometry and complex content.
There is also a feature to capture shapes inside page boundaries: now the two features interact with
each other better.
This work is primarily for Collabora Online, but the feature is
available in desktop Writer as well.
As described in a previous post, Writer implements the TextBox
feature with a pair of objects: a Draw shape (with complex geometry) and a (hidden) Writer TextFrame,
providing complex content. To avoid wrapping problems, the underlying TextFrame always has its wrap
type set to "through", i.e. text may wrap around the Draw shape, but the hidden TextFrame is always
ignored during text wrapping.
In most cases this provides the expected behavior, because the user sees one object, so wrapping
around at most one object is not surprising.
However, there is also an other feature, that shapes may be captured inside page frames: if their
position would be outside the page frame, Writer corrects this, so they are not off-page. This also
makes sense, so it can't happen that your document has a shape that is hard to find, due to a silly
position.
The trouble comes when these two are combined: the Draw shape's position gets adjusted to be
captured inside the page frame, but the TextFrame's wrap type is "through", and objects with this
wrap type are an exception from the capturing mechanism, so the position of the two shapes get out
of sync.
The problem is now solved by improving the layout, so in case the TextFrame is actually part of a
Draw shape + TextFrame pair (forming a TextBox), then we calculate the effective wrap type of the
TextFrame based on the wrap type of its Draw shape, so either both objects are captured or none,
which results in consistent render result.
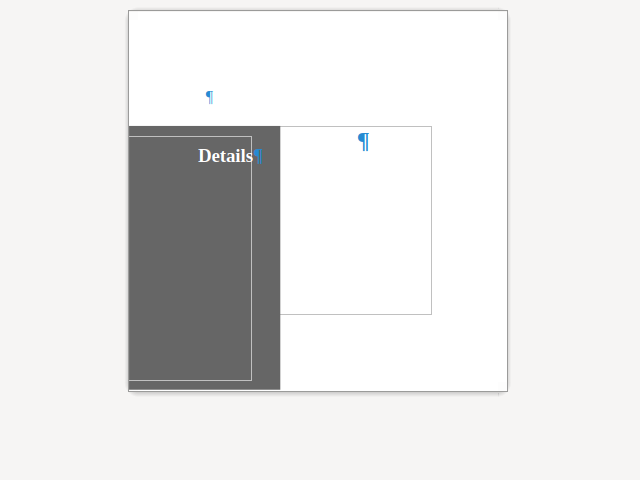
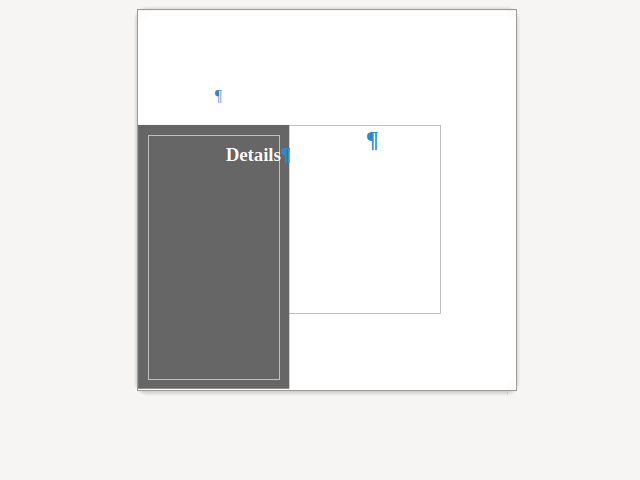
Here is a sample document where all margins are configured to be equal, but capturing corrected the
Draw shape (and not the TextFrame):
You can get a development edition of Collabora Online 24.04 and try it out yourself right now: try
the development edition. Collabora intends to continue
supporting and contributing to LibreOffice, the code is merged so we expect all of this work will be
available in TDF's next release too (25.2).